
Thursday, December 17, 2009
Cute Stick Horse
I thought about getting stick horses for my youngest two for Christmas, but just didn't do it. I found this adorable pattern to make your own (the fabric is a bit wild). The problem: the pattern is $17. Has anyone done anything like this of know how to do it?
Wednesday, December 16, 2009
Black Apple Doll

Tammy really needs to learn how to post on here, because she is always making things. Like this cute doll. I came across this pattern a couple years ago, but never made one. Tammy came across it the other day and has already made the cutest little doll! I thought I would do some of the work for Tammy and post this for her. :) You can see a video of the artist/creator, Emily Martin, on Martha making the dolls, if you are a visual learner (like me). And you can get the free pattern here! Or you can visit the Black Apple etsy shop and blog to see more from Emily. Tammy, send me a picture of your cute doll and I'll put it in this post!

Update: I made one for Ava. She's not perfect, but I think she turned out pretty cute. I added pony tails and a little ruffle skirt. The inspiration for the face is from one of my favorite little paintings over at Tollipop. It really was easy and fast to whip this out. I would recomend watching the video first. She has a good tip on sewing the arms and legs = sew first, cut it out after. I added poly beads instead of rice because I'm sure I'll have to wash her at some point.

Wednesday, December 2, 2009
Christmas PJ's
I'm up to my ears in Christmas PJ's. This is the first year I have ever made them myself. I've got to do it once, right? James was making fun of me a little, but oh well. They will be cute, but I think next year I will just get on the Glenda/Tammy train and only make the bottoms.
Tuesday, December 1, 2009
Flower Bows
I think these flower bows are adorable. Has anyone done anything like this before? If so, please post instructions. Thanks
So You Think You're Crafty

So You Think You're Crafty is the blog that Tresa mentioned at the gathering. They have some really cute things on there. This Turkey Dressing Skirt is SOOOO cute!! I love the graduating colors.
Monday, November 30, 2009
Fun Website
I stumbled upon this great website, Moda Bakeshop, today. Moda is a quality line of fabric, so the projects are all fabric related. There was some great quilt patterns and other fun misc things. Check it out!
Tuesday, November 17, 2009
Quilted Advent Calendar

Because we all have nothing to do before Christmas arrives, why not make a quilted advent calendar? :p
I saw something like this (but not as cute) in a magazine a couple years ago. I ripped out the page and put it on my sewing room wall, thinking I would make it someday. Someday hasn't happened yet, but when I came across this tutorial I was thrilled! I don't have to figure out the MATH! And that's half the battle, right? I thought I would share, just in case you need one. I won't be surprised if Tammy has one whipped up by Turkey Day.
Colored Pencil/Notebook Holder

Here is the link the DIY Pencil and Drawing Pad Holder. This also went together very quickly. This picture is actually some that someone else made using this tutorial. I wish she had put how long to make the button loop, since I made mine too long. :( I'm not good at math. *Note: Next time I would make it about 1/4" taller. So instead of cutting it @ 12 1/2", cut it 12 3/4", to make up for space taken up by the top stitching.
I'll post about the one I make for Eliza (for 24 pencils) when I get it figured out.

Here is the link to the thread catcher/pin cusion that I showed you. *Note: make the bag lining and outer bag the same size. Don't make the lining smaller like the pattern says. This goes together very quickly, I promise. I made both of my thread catchers in one afternoon.
Friday, October 23, 2009
Free Hot Pad tutorial

I just got a newletter with this free tutorial on making hotpads. I know Tammy has been making some hot pads using a freehand quilting instead of the diagonals like in this tutorial. I thought I would share. Tammy, I'd love to see the hotpads you have made.
Tuesday, October 20, 2009
Glue Stick Zipper Tutorial
A link to the zipper tutorial.
I'm still having problems with moving the zipper 'handle' out of the way after sewing up to a certain point. Does anyone have any ideas? My sewing looks a bit crazy at the top because I can't move the handle (I know there is a different word for this!) down and my zipper foot can't get up and over it. Any suggestions would be appreciated!
PS - Tamara, thanks for hosting at your house today. I'm so sorry that we left without cleaning up. I hope the mess wasn't too bad!
Elastic Thread
Here is the link the where I got my huge spool of elastic thread. If you want to try it out before you buy, come on over and load up a bobbin off my spool.
Glenda's Bag Tutorial


PS. I found that if I printed it directly from the page, it looked wierd. If I download it and save it, then print it, it looks fine. Don't ask me why.
Thursday, September 24, 2009

Saturday, September 19, 2009
Tutu Skirt Instructions
I found a cute Halloween shirt and headband for my little one and would like to make a fun tutu skirt to go with it. Has anyone done one of these? I'm sure they are easy, but if I didn't have to figure it out, that would be great. Please post instructions and I will be very grateful! Thanks!
Thursday, September 17, 2009
Check out this website...
My cousin showed me this website....it's got lots of clothing repurposing ideas.
http://makeitandloveit.blogspot.com/
(sorry y'all...I don't mean to be a blog hog!) :-)
http://makeitandloveit.blogspot.com/
(sorry y'all...I don't mean to be a blog hog!) :-)
Hemming Jeans the Cool Way
A friend recently asked me to hem some jeans for her daughter, and she showed me one of her own pairs of jeans that she'd paid $20 to have hemmed by a tailor. They had preserved the original "distressed" bottom of the pant leg. You had to look REALLY close to see they'd even been hemmed.
After careful study of the example pair, I figured out how they did it. It's so slick! Here's my first try, on a pair of maternity jeans that I should only have to wear a few more months. I know it's not perfect -- the black thread was the WRONG choice. But I didn't feel like picking it out and it's really not super noticeable unless you are up close and personal. Use the right color thread and you can't tell AT ALL. :)
Here's the finished product -- you can see the outside and inside. Pretend that black thread was a jeans-color dark blue and that you couldn't really see it.
So you figure out how much you need to cut off to get the right finished length. I'll leave that up to you to figure out. These jeans were a petite size (and I STILL had to shorten them. sheesh.) so I didn't need to take off much.
Here's the process:
1) Cut off however much.
2) Zig-zag or serge both unfinished edges.
3) Fold up a tiny bit (up to 1/4 inch) of the pant leg. Iron it really good, and be careful not to stretch the fabric.
4) Match up the side seams. Tuck the part you cut off under the folded part of the pant leg and get the edge of the fold almost right on top of the existing stitching (the orange-ish thread here). Start sewing, and stay super close to the fold.
 5) Go all the way around both legs, reattaching the original end of the pant leg, with the cool distressed edge.
6) Pat yourself on the back for not having to pay a tailor $20 to do it for you. Enjoy your newly hemmed jeans!
After careful study of the example pair, I figured out how they did it. It's so slick! Here's my first try, on a pair of maternity jeans that I should only have to wear a few more months. I know it's not perfect -- the black thread was the WRONG choice. But I didn't feel like picking it out and it's really not super noticeable unless you are up close and personal. Use the right color thread and you can't tell AT ALL. :)
Here's the finished product -- you can see the outside and inside. Pretend that black thread was a jeans-color dark blue and that you couldn't really see it.

So you figure out how much you need to cut off to get the right finished length. I'll leave that up to you to figure out. These jeans were a petite size (and I STILL had to shorten them. sheesh.) so I didn't need to take off much.
Here's the process:
1) Cut off however much.
2) Zig-zag or serge both unfinished edges.
3) Fold up a tiny bit (up to 1/4 inch) of the pant leg. Iron it really good, and be careful not to stretch the fabric.
4) Match up the side seams. Tuck the part you cut off under the folded part of the pant leg and get the edge of the fold almost right on top of the existing stitching (the orange-ish thread here). Start sewing, and stay super close to the fold.

 5) Go all the way around both legs, reattaching the original end of the pant leg, with the cool distressed edge.
6) Pat yourself on the back for not having to pay a tailor $20 to do it for you. Enjoy your newly hemmed jeans!
Tuesday, September 15, 2009
16 Crayon Roll Tutorial
Pattern Dimensions:
16 5/8" x 8" for the front and back
16" x 4" for the batting (or felt, fleece, whatever)
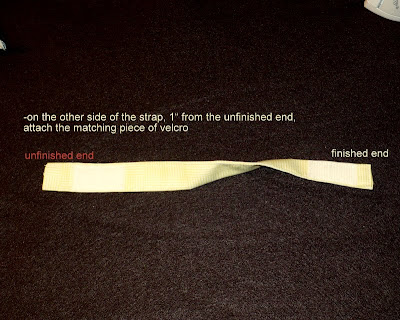
10" x 3" for the velcro strap
1 1/2" length of sew-on velcro
Hopefully the pictures make sense....if not leave a comment and let me know what doesn't make sense. :-) Click on each picture to see it larger.


 Fold up one side of the crayon roll -- use a crayon if necessary to see how far to fold it up. Press the fold. The batting should be in the wider side (the back).


 Sew along your marked lines. Then trim the threads and fill with crayons.


16 5/8" x 8" for the front and back
16" x 4" for the batting (or felt, fleece, whatever)
10" x 3" for the velcro strap
1 1/2" length of sew-on velcro
Hopefully the pictures make sense....if not leave a comment and let me know what doesn't make sense. :-) Click on each picture to see it larger.


 Fold up one side of the crayon roll -- use a crayon if necessary to see how far to fold it up. Press the fold. The batting should be in the wider side (the back).

 Sew along your marked lines. Then trim the threads and fill with crayons.

Wednesday, September 2, 2009
First Meeting!
OK Ladies! It's official. Our first meeting is Tuesday, September 15th @ 10 am at Carrie's house. Ariana and Tammy will both be sharing a project idea with us. No actual sewing will be going on, so leave your tools at home and come ready to have fun and learn new project!
Tuesday, September 1, 2009
Subscribe to:
Posts (Atom)
